Latest imported feed items on All about Dynamics 365 for TalentLatest imported feed items on All about Dynamics 365 for Talenthttps://thierrysdynamics365fortalent.com/2026-03-01T22:36:48+00:00
WP RSS Aggregator
What’s new – ‘fix’ that years of service figure2021-07-13T14:48:51+00:002021-07-13T14:48:51+00:00Sometimes it’s the little things that make a really big difference. This is one of those little things that people have been asking me about for ages, but I’ve never had a perfect answer for. Until now… What’s it called? The feature is called ‘Years of service calculation’ in the feature management workspace. Why should ... Read more
The post What’s new – ‘fix’ that years of service figure appeared first on tomelliott.co.uk.
Sometimes it’s the little things that make a really big difference. This is one of those little things that people have been asking me about for ages, but I’ve never had a perfect answer for. Until now…
What’s it called?
The feature is called ‘Years of service calculation’ in the feature management workspace.
Why should I be interested?
If you’re tracking service dates for anyone whose continuous service date isn’t their employment start date in the current legal entity, you need this feature. This is about the number that’s shown on the right hand side of the header, either on the new (‘streamlined employee entry’) worker form or in the People workspace. Previously, this number could only be based on their employment start date – meaning anyone who had transferred between entities of the same business, or who you were recognising previous service for after a transfer in under TUPE (or equivalent, for you non-UK folks), would not have the right number showing.
What does it do?
Enabling the feature allows you to select which date the form uses to calculate years of service. With the option to choose from employment start date, seniority date, or adjusted start date. Given that seniority date is attached to the worker themselves and not any particular employment in any particular legal entity, that’s potentially very helpful.
How do I set it up?
Enable the feature in feature management (remembering you might have to hit ‘check for updates’ to get this one to appear – especially if you haven’t been in there for a bit).
A new parameter then becomes available in Human Resources Parameters. It’s on the ‘general’ tab under ‘Years of service display’:
Hit save, do a browser refresh for luck, and you should start to see the impact of the change pretty quickly.
Anything else I should be aware of?
A couple of things:
Don’t make my mistake and assume that because you’ve picked seniority date once, the number will suddenly be visible regardless of your operating entity. Remember that because it’s found in Human Resources Parameters (and not shared parameters) this setting is legal entity specific. If you’re in GBSI, looking at a worker who’s not employed there, and you don’t see a value – check you set that parameter to seniority date in GBSI. This is the voice of confused experience.
This is obvious – but remember that seniority date isn’t a mandatory field, and it might not be populated. If there’s no data there, clearly there’s nothing to base the service calculation on.
]]>
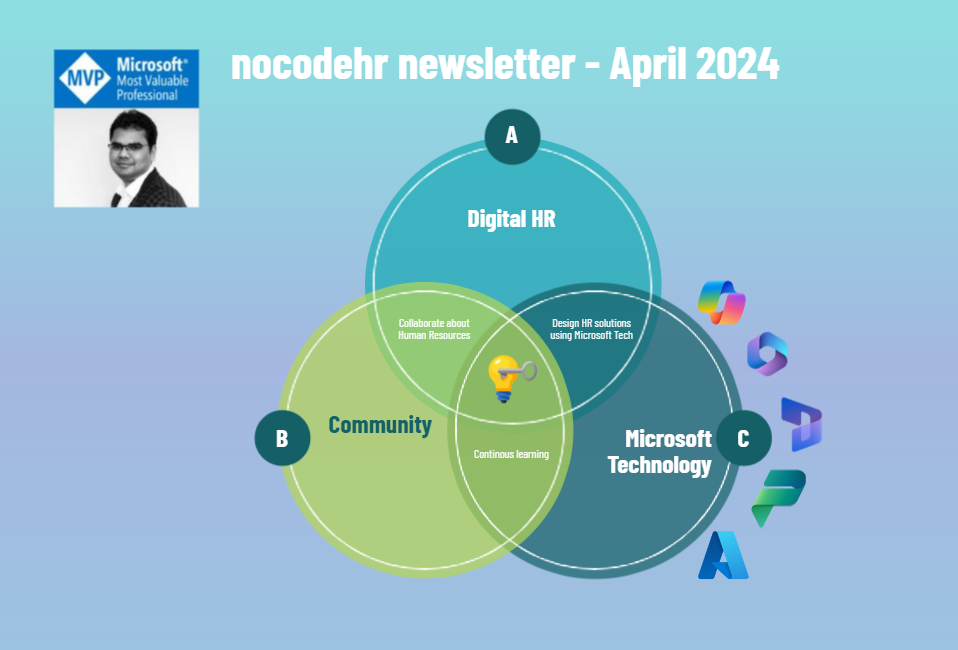
Tomtomelliott.co.ukhttps://www.tomelliott.co.uk/https://nocodehr.com/?p=2734nocodehr newsletter – April 20242024-04-30T21:44:37+00:002024-04-30T21:44:37+00:00The spring time is taking better shape but the weather seems to be confused sometimes (atleast in The Netherlands) – doesnt want to be sunny and bright or rain and shine at the sametime making rainbows. Anyway I am hoping... Continue Reading →
The post nocodehr newsletter – April 2024 appeared first on Welcome to nocodehr!.
The spring time is taking better shape but the weather seems to be confused sometimes (atleast in The Netherlands) – doesnt want to be sunny and bright or rain and shine at the sametime making rainbows. Anyway I am hoping for more sun in the coming weeks and looking forward to the summer ahead.
I was in Lisbon over the last weekend and met all the amazing people from the community and enjoyed all the learning. The best quote I carried from the event was from Michaell Gall about Human Resources – ”We should focus on the strength of Human Resources being tightly integrated with other business domains and co-pilot for Human Resources will propel the capabilities in the short term”
Thanks for taking the time read the nocodehr monthly newsletter of April 2024. It is a collection of small knowledge bites that has helped me learn something new from the Microsoft community and information about the past/upcoming community events!
#mc_embed_signup{background:#fff; clear:left; font:14px Helvetica,Arial,sans-serif; width:100%;}
/* Add your own Mailchimp form style overrides in your site stylesheet or in this style block.
We recommend moving this block and the preceding CSS link to the HEAD of your HTML file. */
Do you think my blog helped you? Then please share it with your network on LinkedIn!
]]>
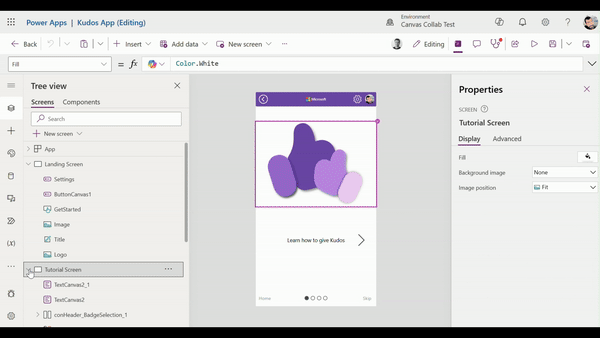
KamalWelcome to nocodehr!https://nocodehr.com/Build apps as a team with live coauthoring2024-07-01T22:26:17+00:002024-07-01T22:26:17+00:00Today, we are thrilled to announce the much-anticipated Canvas Coauthoring experience is entering Preview and is now available for the public worldwide, including sovereign clouds. Coauthoring will bring a new level of collaboration and productivity to Power Apps developers.
The post Build apps as a team with live coauthoring appeared first on Microsoft Power Platform Blog.
Summary:Today, we are thrilled to announce the much-anticipated Canvas Coauthoring experience is entering Preview and is now available for the public worldwide, including sovereign clouds. Coauthoring will bring a new level of collaboration and productivity to Power Apps developers.
Accelerate collaboration and productivity
Gone are the days of waiting for one person to finish their edits before you can jump in! Now, multiple makers can edit a canvas app simultaneously in the same editing session. Coauthors will be able to see their own and colleagues’ changes compiled into a running app in real-time. Similar to Office-style collaboration, you will be able to see your teammates’ real-time presence via adorners in the command bar, tree view, and most importantly, authoring canvas so you will know exactly where and what your colleagues are working on in the app.
Coauthoring allows multiple makers to work on different parts of a canvas app at the same time, speeding up the development process. This is dramatically faster than traditional development cycles of merging and compiling local changes that the previous solo editor experience allowed. This is also a major improvement for current Power Apps development teams, removing the need to divide efforts or consolidate changes from multiple app instances. We believe this will accelerate your app development cycles and we can’t wait to hear the amount of time and effort Coauthoring has saved your fusion teams!
This is the latest in our collaboration updates, including Commenting and Coauthoring for Model Driven apps to drive collaboration and increase productivity for Power Apps developers.
How to start working with other developers
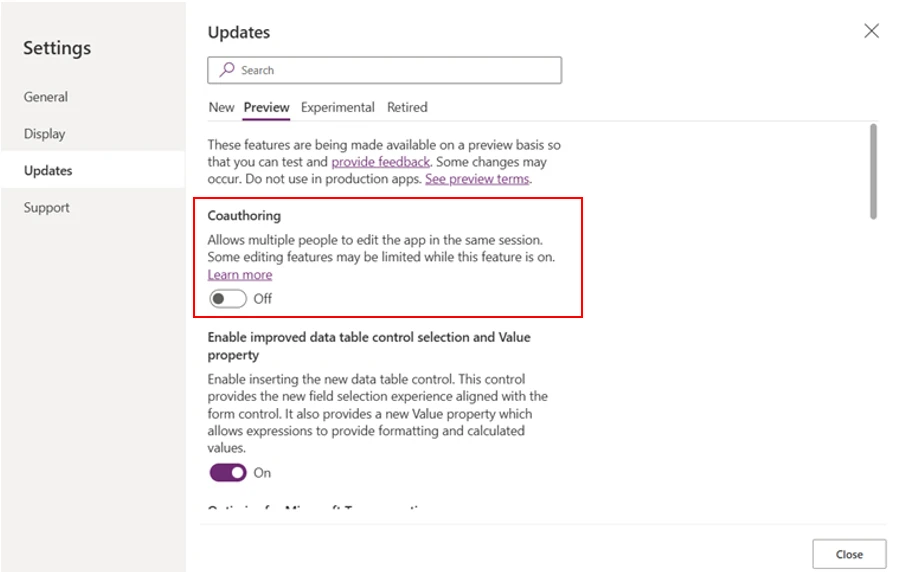
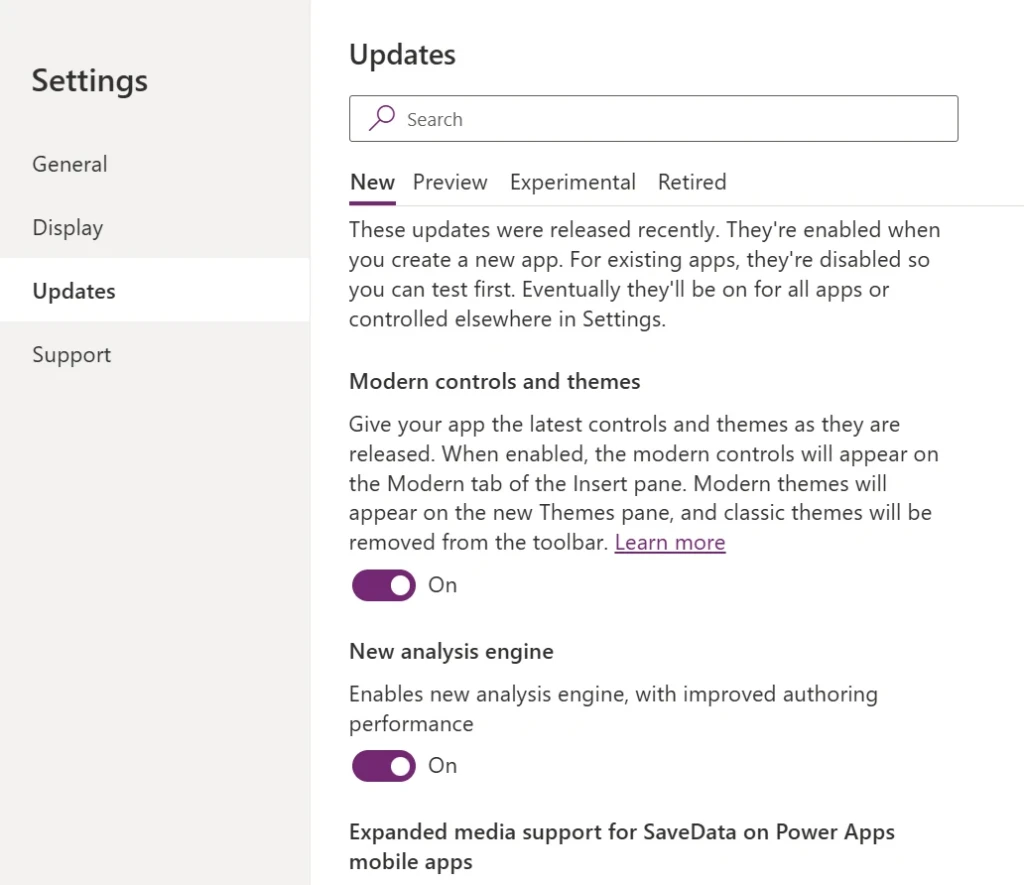
During Preview, Canvas Coauthoring will be off-by-default. To enable this experience, makers will need to toggle on the Coauthoring setting in the app they would like to coauthor in by going to Settings > Updates > Preview.
The inital preview includes some limitations, documented here. As we build towards General Availability, you can expect fewer limitations and we would love your feedback on which features we should include next in our Coauthoring journey.
Get started now
We can’t wait for you to try Canvas Coauthoring while in the Preview stage. Your feedback will be instrumental in shaping the future of this feature as we journey towards GA. Please visit our documentation to learn more details about this experience.
]]>
Clay WesenerPower Apps Archive - Microsoft Power Platform Bloghttps://powerapps.microsoft.com/fr-fr/blog/feedWhat’s new in Power Apps: June 2024 Feature Update2024-07-02T22:57:14+00:002024-07-02T22:57:14+00:00This month we're excited to share collaboration updates for canvas, the release of the Copilot enabled ERD view and Catalog, key updates for security and a huge set of Learning and Documentation updates.
The post What’s new in Power Apps: June 2024 Feature Update appeared first on Microsoft Power Platform Blog.
Summary:Welcome to the Power Apps monthly feature update! We will use this blog to share what’s new in Power Apps. A summary of product, community, and learning updates from throughout the month so you can access it in one easy place. This month we’re excited to share collaboration updates for canvas, the release of the Copilot enabled ERD view and Catalog, key updates for security and a huge set of Learning and Documentation updates.
Get started with the latest updates today!
Jump into Power Apps to try the latest updates, you can use an existing environment or get started for free using the Developer plan.
We are thrilled to announce that the highly anticipated Canvas Coauthoring experience is entering Preview and now available for the public worldwide, including sovereign clouds. Only one editor at a time no more! Now, up to 10 makers can edit a canvas app simultaneously in the same editing session. Makers will be able ability see others edits in real-time, and similar to Office’s collaborative experience, they will be able where and what their teammates are working on in the app via real-time presence adorners on the authoring canvas.
This groundbreaking experience is set to accelerate app development cycles for fusion teams by revolutionizing and streamlining the way makers collaborate together in the Canvas Designer. Now with Coauthoring, fusion teams do not need to rely on app development processes created as workaround for the previous solo editor experience, including dividing efforts across multiple app instances and consolidating changes later.
We can’t wait for you to try the Canvas Coauthoring Preview. Your feedback will be instrumental in shaping the future of this feature as we journey towards GA. Please visit our documentation to learn more details about this experience.
Work with complex data models in an ERD view assisted by Copilot
To build meaningful business applications, data models consisting of multiple tables are almost always essential. We’re excited to announce the public preview of a brand-new data experience that simplifies working with complex data models in an Entity Relationship Diagram (ERD) view with the assistance of Copilot.
This innovative feature revolutionizes the way you work with data from various sources, including natural language inputs, Excel files, and SharePoint lists, all through an intuitive drag-and-drop interface. What’s more, with Copilot by your side, it’s time to say goodbye to repetitive tasks. Copilot will handle the heavy lifting, like populating sample data and configuring table metadata, so you can focus on what matters most – creativity and strategy.
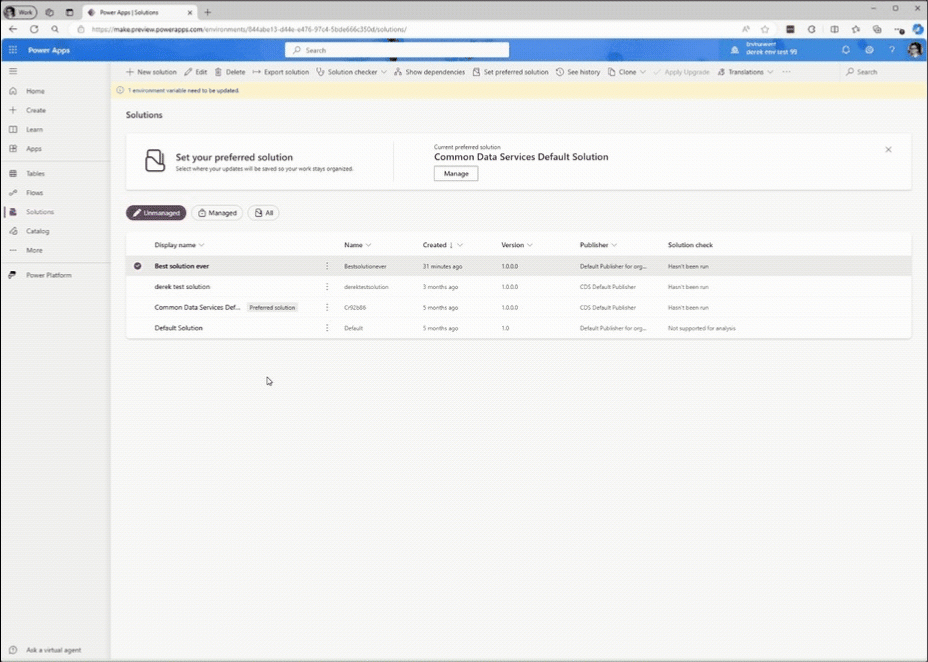
Catalog enables makers to share and install re-usable components and templates that are customized for their orgs, by their orgs. This provides much more useful starting points than generic templates.
Because the Catalog is built on top of our Solutions framework, you can also easily install catalog items from any environment in a tenant, update items so that makers use the most recent, authoritative version, and have catalog components accessible from authoring experiences, like Power Apps Studio. The catalog also comes with Enterprise level security. By default, catalog items must be approved by a delegated approver before they can be officially published and accessible by your org. There are also access controls for users to be able to submit, acquire, approve, or administer the catalog. In order to resubmit new versions, a maker needs to belong to the original publishing group. The catalog now enables you to manage your re-usable assets across your tenant in a secure way.
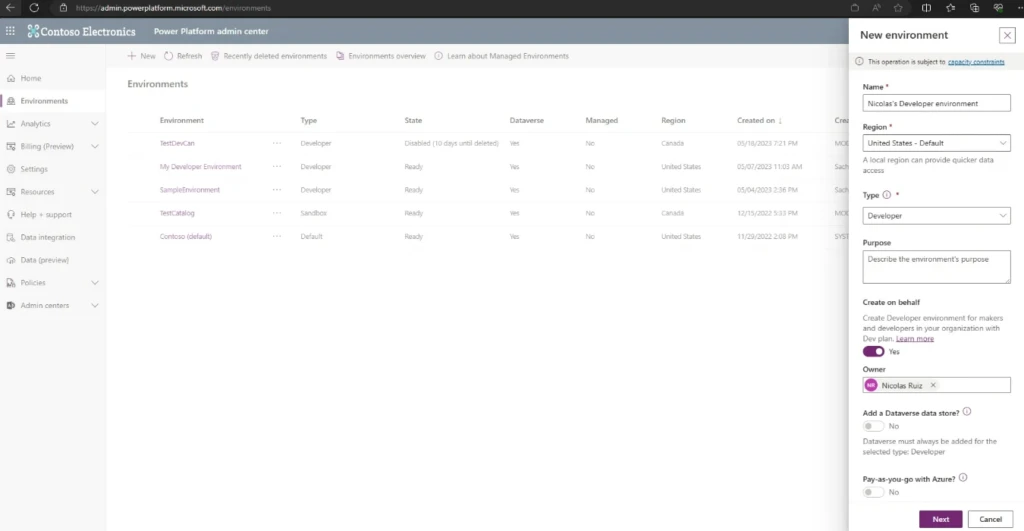
Developer environment and plan now available in Sovereign clouds
We’re thrilled to announce that the Power Apps Developer Plan is now available in sovereign clouds starting with GCC and later this year will be available in GCCH and DOD.
Developer Plan is needed to get Developer Environments, which offer personalized spaces for makers to experiment, innovate, and build. They provide premium capabilities like Dataverse and premium connectors at no additional cost. These environments also adhere to your organization’s default Data Loss Prevention (DLP) policy for security. Striking a balance between control and empowerment.
Improved management of new and preview features for canvas apps
We’ve introduced a new category in canvas app settings to help you identify between newly released and preview features. We needed a new category that clearly indicates that features are GA and the long-term direction of the product, and yet still needed the flexibility of having a switch to control the feature. The switch allows us to slowly deploy the feature and watch for problems, and at the same time gives you control to enable the feature for your production workloads on your own schedule especially when a breaking change is involved.
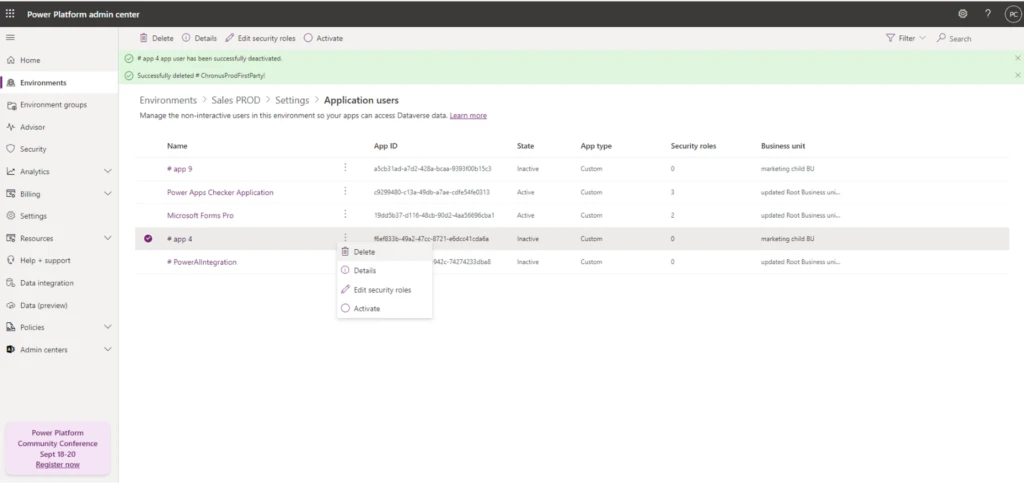
Public preview for delete app users and view platform app users
Admins can take advantage of a modern and accessible UI to manage application users. Admins can do this by using the Application users page in the environment settings in the Power Platform admin center. Application users can be added, updated (or refreshed), and now inactivate application users can be deleted. Admins can also view the list of platform application users with their respective security role assigned.
General availability of delete group team members when the associating Microsoft Entra group is deleted.
When a Microsoft Entra group is deleted from the Azure portal, all Dataverse group team members will be removed within 24 hours. Previously, if a group team member logged into Dataverse after the Microsoft Entra group was deleted, the team member was removed from the Dataverse group team. This left other team members in the Dataverse group team because they did not access the system. To eliminate any unauthorized data access issues, all team members are automatically removed from the group team upon deletion of its associated Microsoft Entra group.
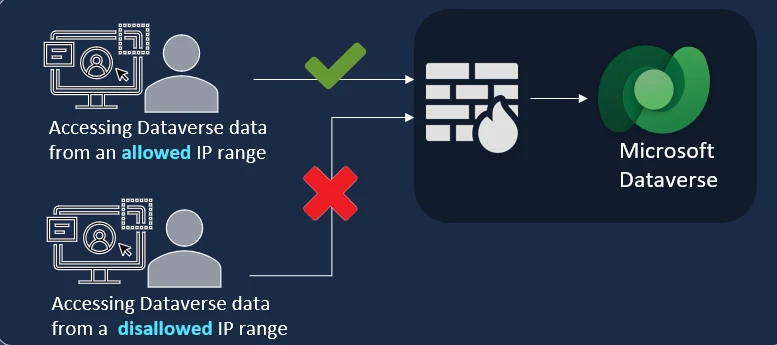
Currently, the IP firewall is set up to support only the Dataverse OData endpoint, which means that IP-based access restrictions do not apply to the TDS endpoint. This implies that customers are unable to set up IP-based access controls for the TDS endpoint. However, the recent introduction of IP firewall capabilities for the TDS endpoint now allows customers to apply IP restrictions, enhancing the security of their TDS endpoint access.
Join Scott Durow as he chats with Scott McKenzie from Fort Vermilion School District in Canada, who showcases an inspiring education framework app that he has developed giving teachers the ability to interact with millions of rows of student data stored in Dataverse, using a beautiful drag and drop user interface. The speed at which he has used Power Apps to transform their educational data management and student assessments system is truly inspiring.
YAML Essentials for the Power Platform
You may have heard about something called YAML and wondered what it is. In this beginner’s guide to YAML for Power Platform, I’ll give you an overview of what YAML is and explain the key concepts of YAML like data types and key-value pairs. I’ll also walk you through why you need to know about YAML as a Power Platform developer and how and where you can use it within the Power Platform including in Copilot Studio and Power Apps. By the end of the video, you’ll have a solid grasp of YAML and be ready to start using it in Power Apps and Copilot Studio.
]]>
Clay WesenerPower Apps Archive - Microsoft Power Platform Bloghttps://powerapps.microsoft.com/fr-fr/blog/feedhttps://changethework.com/?p=15210Pourquoi la formation au management hybride est encore essentielle en 20242024-10-21T17:34:15+00:002024-10-21T17:34:15+00:00Le management hybride a évolué, mais il reste un sujet d’actualité. Alors que beaucoup pensent que le télétravail et les pratiques hybrides sont bien maîtrisés, les responsables formation se rendent compte que les défis, eux, continuent de changer. C’est pourquoi il est encore indispensable de former vos managers pour qu’ils soient en phase avec les […]
The post Pourquoi la formation au management hybride est encore essentielle en 2024 appeared first on Change The Work.
Le management hybride a évolué, mais il reste un sujet d’actualité. Alors que beaucoup pensent que le télétravail et les pratiques hybrides sont bien maîtrisés, les responsables formation se rendent compte que les défis, eux, continuent de changer. C’est pourquoi il est encore indispensable de former vos managers pour qu’ils soient en phase avec les […]
]]>
Sarah AkelChange The Workhttps://changethework.com/679a621d3a4ac3cbc523d792Copilot Studio + AI Prompts: A fit, Coffit.2025-02-02T13:55:18+00:002025-02-02T13:55:18+00:00A week ago, I was in a job interview, and we discussed Agents . A long time ago, when Power Virtual Agents was only topic-solution...
A week ago, I was in a job interview, and we discussed Agents. A long time ago, when Power Virtual Agents was only topic-solution oriented, I remember seeing a virtual agent that used to match your answers to a certain beer. So I thought ok, let's do something with Coffee, I decided to call it Coffit, as it is a combination of Coffee and Fit. Yeah, a bit lazy I know, but it sort of makes sense.
I started giving some of my inputs into the initial page of CopilotStudio, where I can actually prompt the idea. Turns out I wasn't really happy with the results, so I needed to add some logic behind with my own hands.
Let me guide you on the process I made. Below you will find an image of the overview of my little Coffit (in the left image you can see the little logo I made for the agent).
In the overview, there are some remains of the prompt piece that I initially started, and then decided to follow up manually. See the instructions, those are prompted.
For knowledge I added specific resources that had an intimate relationship with coffee, it goes without saying that some websites contained good info about it, classical coffee brands and a really interesting resource that was very descriptive on types of coffees.
I created a topic to help me design the questions and answers and take those variables into an AI prompt. So in the video below you can see how the four questions have three predefined answers. Each of the answers is stored in a variable.
So the four variables feed an AI prompt that retrieves the best fit based on the four components:
adventure
️ challenge
companion
excitement
Once these variables are collected, the prompt is triggered and the user receives a message with the perfect coffee match. The outcome can be found at the end of the image on the right. This will be displayed as a message that not only contains the type of coffee but also gives a cool idea of why that is the perfect fit, meaning the reason why it was a perfect fit.
AI prompts are part of the Power Platform cool stuff that can be retrieved into apps, automation and agents, and that is exactly what we are doing here. The prompt below is not perfect nor ideal - I was lazy with my writing but it does the job and that is all I care about now.
In the video below you can see the agent in action, I'm pleased with the final solution and would like to add some ordering actions directly from the agent. I'm considering adding voice features so it's more inclusive and adapts to different scenarios and needs.
Find below a small Coffit demo:
This solution - silly as it is - can illustrate so many cool scenarios where it can be applied. I'm thinking cultural fit company candidate, fit between open roles and candidates. Probably some other scenarios that are not only HR ones, can you think of any?
]]>
Ana Inés UrrutiaAna Inés Urrutiahttps://www.anainesurrutia.com/67969fba66e76ecb19efd545AI Models + AI prompts: CV screening with Power Apps and Power Automate2025-03-10T16:35:53+00:002025-03-10T16:35:53+00:00During my career, I've been very lucky to find amazing human beings from whom I learn constantly. I met Denisa two years ago, we got...Ana Inés UrrutiaAna Inés Urrutiahttps://www.anainesurrutia.com/homehttps://news.microsoft.com/source/emea/?p=4434215 milestones that shaped Microsoft’s vision for AI2025-04-11T12:24:52+00:002025-04-11T12:24:52+00:00The post 15 milestones that shaped Microsoft’s vision for AI appeared first on Source EMEA.
]]>
Milica MarkovicSource EMEAhttps://news.microsoft.com/source/emea/https://meganvwalker.com/?p=9812Include Add To Google Calendar Button On Realtime Emails2025-04-15T07:20:00+00:002025-04-15T07:20:00+00:00While recently working on a post for generating emails for Microsoft Bookings and putting together an ICS file, I thought about what a fiddle it is (polite phrase) add an ICS file to your Google calendar. I had also recently booked a couple of restaurants online and noticed one of them had a specific Add … Continue reading Include Add To Google Calendar Button On Realtime Emails
While recently working on a post for generating emails for Microsoft Bookings and putting together an ICS file, I thought about what a fiddle it is (polite phrase) add an ICS file to your Google calendar. I had also recently booked a couple of restaurants online and noticed one of them had a specific Add To Google option in the auto responder email. Wondering how that could be done in Customer Insights – Journeys, I chuckled when I realised how easy it could be. Basically, a URL has a bunch of values passed through as parameters which are then mapped in to fields on a new calendar event in Google. If you want to give it a try, take a look at one way to include an Add To Google Calendar button on your emails.
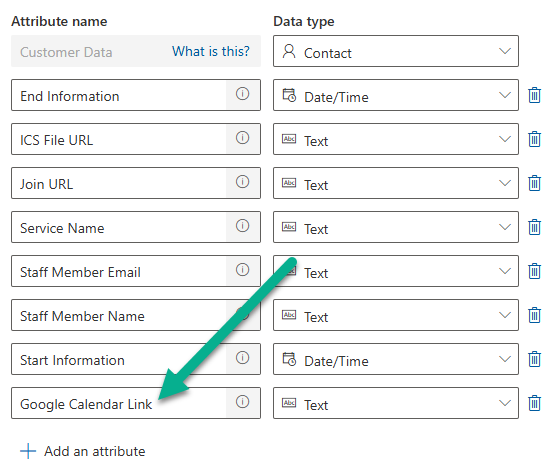
Although you could build out the URL dynamically for each email, it’s probably better using a trigger. Or you could have a flow that runs each time an event or appointment of some kind is created in your D365 environment and build out the URL then. Either way depends on your patience and requirements. For this, I am going to built on the Microsoft Bookings post (last one I did before this one) and update the trigger to include a Google Calendar Link.
Click to view in detail
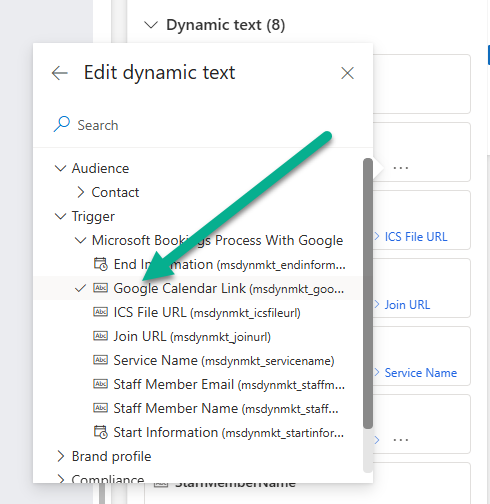
I am then going to add it in to an email by passing it through to a button dynamically.
Click to view in detail
I have mapped it to the Google Calendar Link value from the Microsoft Bookings Process With Google trigger. All simple so far. Make your email live and you can add it to a Journey ready to go.
Click to view in detail
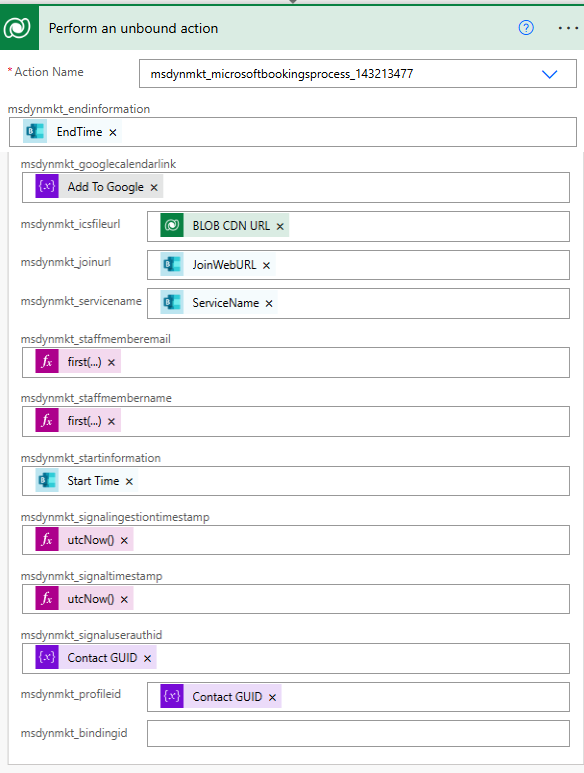
In Power Automate, you will likely be wanting to do other things in the flow, so I am just going to focus on the steps needed to generate the full URL. This is what it looks like in my initialise variable step (can also use a Compose step if you want).
Click to view in detail
The generated URL will end up looking something like this. It’s made up of a series of parameters that I will walk through. Don’t just copy and paste as they include examples. You just need the parameter and then dynamically pass through the correct value in your flow.
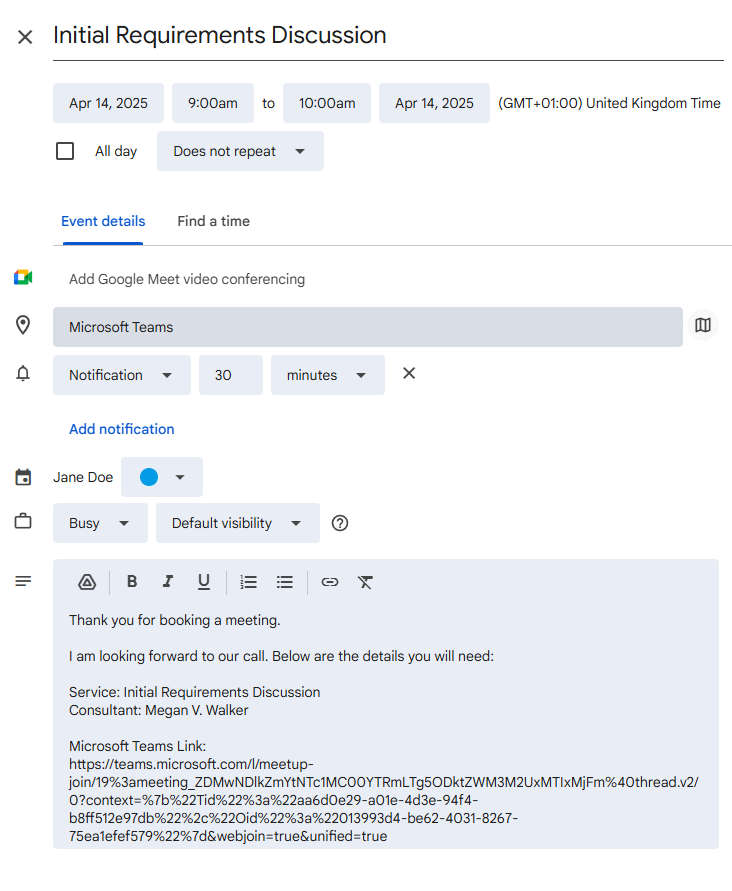
https://calendar.google.com/calendar/event?action=TEMPLATE&text=Initial Requirements Discussion&location=Microsoft%20Teams&dates=20250414T080000Z%2F20250414T090000Z&ctz=Europe/London&details=Thank you for booking a meeting.<br><br> I am looking forward to our call. Below are the details you will need:<br><br>Service: Initial Requirements Discussion<br>
Consultant: Megan V. Walker<br><br>Microsoft Teams Link:<br>https%3A%2F%2Fteams.microsoft.com%2Fl%2Fmeetup-join%2F19%253ameeting_ZDMwNDlkZmYtNTc1MC00YTRmLTg5ODktZWM3M2UxMTIxMjFm%2540thread.v2%2F0%3Fcontext%3D%257b%2522Tid%2522%253a%2522aa6d0e29-a01e-4d3e-94f4-b8ff512e97db%2522%252c%2522Oid%2522%253a%2522013993d4-be62-4031-8267-75ea1efef579%2522%257d%26webjoin%3Dtrue%26unified%3Dtrue
Now I am going to use the text parameter to add the subject or title of the event that will be added to your Google calendar. So for my title I am using a Service Name value passed through when a Microsoft Booking is made. Yours might be the subject from an Appointment or the name of an Event.
&text=Initial Requirements Discussion
Next we can add in the location. For my example, the events are online so I am just adding Microsoft Teams, but you can pass through an address for this parameter which will go in to the location field on the calendar event.
&location=Microsoft%20Teams
Now the dates with start and end times included. They need to be in the format of yyyyMMddTHHmmss followed by a Z. This time format is known as ISO 8601 in its extended basic format with UTC time notation. In between the two values, include %2F which is an encoded representation of the forward slash, then the end time with a Z.
&dates=20250414T080000Z%2F20250414T090000Z
This one is a bit of a pain, the timezone. Dataverse uses Windows timezone, and Google Calendar uses something called IANA. So in Windows it might be GMT Standard Time, but in IANA it would be Europe/London. Short of hard coding a bunch of them, hopefully you just work in one timezone so can set it in to the link like this. If not, and it’s important, you can do some mapping with a Switch condition or some expressions (good luck!).
&ctz=Europe/London
Finally, we need to details portion which would go in to the description of the Google Calendar event. It will understand some basic HTML so I have used <br> for some line breaks. If you are trying to include hyperlinks, you will need to wrap that around uriComponent so that it doesn’t mess things up, like this:
&details=Thank you for booking a meeting.<br><br> I am looking forward to our call. Below are the details you will need:<br><br>Service: Initial Requirements Discussion<br>
Consultant: Megan V. Walker<br><br>Microsoft Teams Link:<br>https%3A%2F%2Fteams.microsoft.com%2Fl%2Fmeetup-join%2F19%253ameeting_ZDMwNDlkZmYtNTc1MC00YTRmLTg5ODktZWM3M2UxMTIxMjFm%2540thread.v2%2F0%3Fcontext%3D%257b%2522Tid%2522%253a%2522aa6d0e29-a01e-4d3e-94f4-b8ff512e97db%2522%252c%2522Oid%2522%253a%2522013993d4-be62-4031-8267-75ea1efef579%2522%257d%26webjoin%3Dtrue%26unified%3Dtrue
Click to view in detail
Once the link has been generated, we can then pass it through to the custom trigger by using the variable we created.
Click to view in detail
Now when the trigger fires and the person goes on the Journey, their email will have a lovely Add To Google button.
Click to view in detail
And clicking on the button will take them directly to Google so they can just save to their calendar. Hooray!
Click to view in detail
]]>
Megan V. WalkerMegan V. Walkerhttps://meganvwalker.com/https://paragchapre.com/?p=16698Time Entry and Approval in Dynamics 365 Human Resources2025-06-20T09:07:39+00:002025-06-20T09:07:39+00:00Dynamics 365 HR time tracking helps organizations monitor working hours, ensure policy compliance, and streamline payroll. The platform offers intuitive tools for employees to enter time and robust approval workflows for managers, ensuring accuracy and accountability across your workforce. Here’s a simple step-by-step explanation of how employees can clock in, clock out, and log project…Parag ChapreParag Chaprehttps://paragchapre.com/https://paragchapre.com/?p=16710The Complete Guide to Integrate Microsoft Dynamics 365 CE & F&O2025-06-24T13:44:03+00:002025-06-24T13:44:03+00:00Discover the best ways to integrate Microsoft Dynamics 365 Customer Engagement (CE) and Finance & Operations (F&O), with a deep dive into Dual-Write, Dataverse, APIs, Power Platform, and more.Parag ChapreParag Chaprehttps://paragchapre.com/688ddd64703020ba46e14d74Automated CV Import for D365 HR Recruitment add-on2025-08-02T12:06:40+00:002025-08-02T12:06:40+00:00Manual CV upload sucks, therefore is a long forgotten task, often done halfway or not even done. Unless the applicant applies and...Ana Inés UrrutiaAna Inés Urrutiahttps://www.anainesurrutia.com/homehttp://readyxrm.blog/?p=12951I recreated Dynamics CRM with the Power Platform Plan designer2025-08-06T12:24:46+00:002025-08-06T12:24:46+00:00In January 2003 after many months of engineering and development, Microsoft released one of the first business solutions built-in house; Microsoft Business Solutions Customer Relationship Management (CRM). This of course evolved into Dynamics CRM, of which much of the technical foundation became Dataverse, the bedrock of the Power Platform. I just rebuilt Dynamics CRM in… Continue reading I recreated Dynamics CRM with the Power Platform Plan designer
In January 2003 after many months of engineering and development, Microsoft released one of the first business solutions built-in house; Microsoft Business Solutions Customer Relationship Management (CRM).
This of course evolved into Dynamics CRM, of which much of the technical foundation became Dataverse, the bedrock of the Power Platform.
I just rebuilt Dynamics CRM in an afternoon using AI.
The linked YouTube video walks through the whole process, but here are the high level steps:
Collected various pieces of documentation and information and added those to a Microsoft 365 Copilot notebook.
Initiated a working session with the notebook using a CRIT prompt (Context, Role, Interview, and Task) to build a Product Requirements Document (PRD) that will be the basis for my CRM system.
Used the PRD to create a prompt for a vibe coding or AI solution creation tool (Plan Designer) to build my solution.
Set up a Dataverse developer environment, a publisher and a solution (set to preferred) and used the Plan designer to build and iterate user roles, processes, a Dataverse data model, a model driven Power App, a canvas Power App, a Power Pages website, and a Copilot Studio agent.
Generated system documentation in a PDF file.
Have you tried plan designer lately? Like many new features in the new agentic era, if you had less than good experiences earlier, they do get better. Is is perfect? Not yet.
Observations:
You still need to interject yourself into the process, despite how detailed your prompts may be.
Plan designer doesn’t yet accept PDFs, word documents, Power Points or other document types beyond your text prompt and image files. (This is where M365 helps)
Plan designer still doesn’t know about the Common Data Model. You need to manually swap out the custom tables it wants to build with actual Dataverse tables that already exist.
The table designer provides an amazing ERD view of your data model. However the table editor doesn’t provide options for global choices or some of the new field types (prompt fields).
The table designer now provides default table icons! (not puzzle pieces!)
Plan designer will launch existing app building copilots (Canvas Power Apps, Power Pages, Power Automate, Copilot Studio).
There still is a LOT of clean up and configuration work, but in my opinion, a lot of tedious ground work is accomplished by Plan designer, making it a worthwhile tool to quickly develop a minimal viable product solution.
There is still a lot more it could eventually do.
Summary
Software development is changing… rapidly. And building solutions in the Power Platform are no exception. Currently with generative pages, code apps, and SPAs in Power Pages, the foundation is being set for a new era of low-code solution development. Tools like Plan designer help orchestrate and manage the process so you are not vibe coding your way into a technological nightmare.
Nick Doelman is a Microsoft MVP, podcaster, trainer, public speaker, and competitive Powerlifter. Follow Nick on X at @readyxrm or LinkedIN, and now; Bluesky.
Need Power Platform expertise or training? Check out Nick’s website for more details.
]]>
Nick DoelmanThe ReadyXRM Blog by Nick Doelmanhttps://readyxrm.blog/https://www.cert.ssi.gouv.fr/avis/CERTFR-2025-AVI-0663/Multiples vulnérabilités dans GnuTLS (08 août 2025)2025-08-08T00:00:00+00:002025-08-08T00:00:00+00:00De multiples vulnérabilités ont été découvertes dans GnuTLS. Elles permettent à un attaquant de provoquer un déni de service à distance et un problème de sécurité non spécifié par l'éditeur.CERT-FRhttps://www.cert.ssi.gouv.fr/feed/https://365community.online/what-is-recordset-view-in-dynamics-365-customer-service-quick-explanation-youtubeWhat is Recordset View in Dynamics 365 Customer Service? | Quick Explanation – YouTube2025-08-08T14:28:48+00:002025-08-08T14:28:48+00:00In this video, you’ll learn what the Recordset view (also known as the view or experience) means in the Dynamics 365 Customer Service app. We’ll explain how it helps you work with multiple records, filter data, and navigate efficiently in the app. Perfect for beginners or anyone looking to understand the basics quickly! This video […]
The post What is Recordset View in Dynamics 365 Customer Service? | Quick Explanation – YouTube appeared first on 365 Community Online.
In this video, you’ll learn what the Recordset view (also known as the view or experience) means in the Dynamics 365 Customer Service app. We’ll explain how it helps you work with multiple records, filter data, and navigate efficiently in the app. Perfect for beginners or anyone looking to understand the basics quickly!
This video consists of:
00:00-00:18 Introduction
00:19-1:50 Record set navigator
1:51-3:44 Cases


 :
: